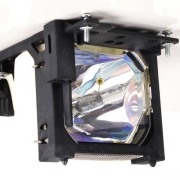
Projector Lamp DT00331/ EP8746LK/ 78-6969-9260-7

Origin: China / Japan
Lamp Type:: 160W UHB
Part Number: DT00331/ EP8746LK/ 78-6969-9260-7
Fit for Brand: 3M
Payment Terms: T/T, Western Union, , PayPal
Delivery Detail: 1-3 days By DHL, FEDEX, EMS etc.
·DT00331/ EP8746LK/ 78-6969-9260-7 replacement projector lamp / bulb for 3M
· DT00331 lamp replacement and time
DT00331 lamp replacement and time
WARNING
•For disposal of used lamp, treat according to the instruction of
community authorities.
•Since the lamp is made of glass, do not apply shock to it and do
not scratch it.
•Also, do not use old lamp. This could also cause explosion of the
lamp.
•If it is probable that the DT00331 lamp has exploded (explosive sound is
heard), disconnect the power plug from the power outlet and ask
your dealer to replace lamp.
The lamp is covered by front glass , but, in rare cases, the
reflector and the inside of the projector may be damaged by scattered broken pieces of
glass, and broken pieces could cause injury when being handled.
•Do not use the projector with the lamp cover removed
DT00331 Lamp Life
Projector lamps have a finite life. The image will become darker, and hues will become weaker,
after a lamp has been used for a long period of time.
Replace the lamp if the LAMP indicator is red, or the CHANGE THE LAMP message appears when the projector is switched ON.
NOTE:
The LAMP indicator is also red when the lamp unit reaches high temperature. Before replacing the
lamp, switch power OFF, wait approximately 20 minutes, and switch power ON again. If the LAMP
indicator is still red, replace the lamp.
Replacing the DT00331 Lamp
1. Switch the projector OFF, remove the power cord from the
power outlet, and wait at least 45 minutes for the unit to cool.
2. Prepare a new lamp.
3. Check that the projector has cooled sufficiently, and gently
turn it upside down.
4. Loosen the two screws as shown in the diagram, and remove
the lamp cover.
5. Loosen the three screws, and gently remove the lamp while
holding the grips. Touching the inside of the lamp case may
result in uneven coloring.
6. Install the new lamp and tighten the three screws firmly.
Also steadily push the opposite side of the screwed lamp into
the unit.
7. Replace the lamp cover in position and tighten the two
screws firmly.
8. Gently turn the projector right-side up
Resetting the Lamp Timer
Reset the lamp timer after replacing the lamp. When the lamp has been replaced after the LAMP
indicator is red, or the CHANGE THE LAMP message is displayed, complete the following
operation within ten minutes of switching power ON. The power will be turned off automatically in
over 10 minutes.

Do not reset the lamp timer without replacing the lamp. Reset the lamp timer always when replacing
the lamp. The message functions will not operate properly if the lamp timer is not reset correctly.
If you have special requirements, please contact us for a quote.
SEE More Projector Lamp For HOT SALES
· SP-LAMP-025 projector lamp/bulb for INFOCUS
· POA-LMP99/ 610-325-2940 replacement projector lamp / bulb for Sanyo
· ELPLP23/ V13H010L23 replacement projector lamp / bulb for Epson
· TLPLU6 projector replacement lamp/bulb for Toshiba
· SP-LAMP-060 projector replacement lamp/bulb for INFOCUS
· ELPLP50/ V13H010L50 replacement projector lamp / bulb for EPSON

